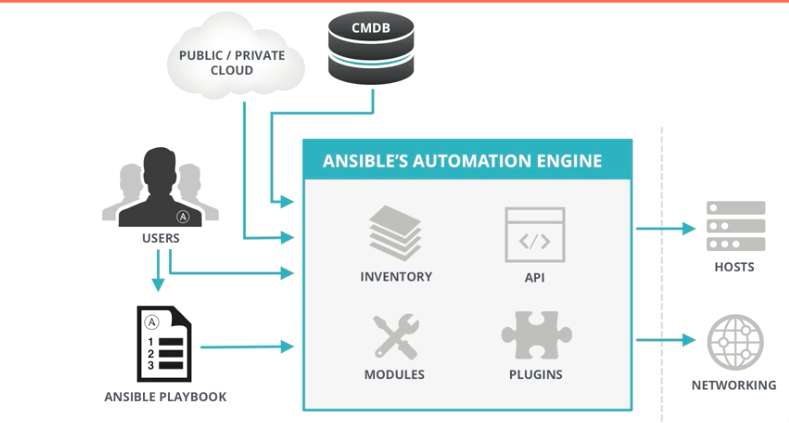
Next Generation HTTP Web Server ( NGINX ) and setup LEMP Stack
NGINX ( Next Generation HTTP Web Server- Pronounced as Engine-X)
LAMP(Linux-Apache-MySql-Php)
LEMP(Linux-Nginx-MySql-Php) -E for "Engine-x"
Currently Apache HTTP Web server is the king of hell on serving the Dominated traffic for the Web Connectivity. Depending on the wiki source the Apache HTTP Web server serves the world 55-60% traffic for the web connectivity.
But why the Nginx gain fraction of importance even though the King Apache HTTP Web server Exists ..........
........................... Read Below for the answer ..............................
How Nginx HTTP Web Server Differs from the Apache HTTP Web server.
The key Factor for all the HTTP Web servers is How it handles the Requests
Apaches's Request Handling Mechanism:
Apache's Model of request handling is "Threaded" or "Process Oriented Approach".
It Generates threads for each Connection and attempts to do as much that processing in parallel. It has both advantages and disadvantages.
The disadvantage of Apache's Threaded request handling is ......
For Static content it gets multiple copies of files & It can take up a additional memory particularly in how it manages sessions.
Nginx's Request Handling Mechanism:
Nginx's Model of request handling is " Asynchronous Event driven handling for requests "
It Means, Although the connections coming in --> Those connections are treated as independently & most importantly they can share the memory space.
So it allows the nginx to more accurately provide predictable performance under very high loads.
This is the main reason nginx gain traction verses Apache.
Comparison of Apache & Nginx:
Apache can serve concurrently in a relatively large linux systems in several hundred connections in parallel depending on the what you doing ...depending on the memory space or modules that you have incorporated.
(vs)
Where as Nginx can in a very small memory foot print so thousands & thousands of concurrent connections are still maintaining keep alive and session states.
What is Nginx as per wikipedia:
Nginx (pronounced "engine x") is a web server with a strong focus on high concurrency, performance and low memory usage. It can also act as a reverse proxy server for HTTP, HTTPS, SMTP, POP3, and IMAP protocols, as well as a load balancer and an HTTP cache.
Nginx Features:

Although HTTP Web server is currently the king of the web servers, nginx is making its mask.
As the ubiquity of the web continues to extend it's reach into every facet of our lives , Performance becomes paramount as concurrency increases.
The Internet of things may be what pushes King off the Wall.
A Simple installtion methods, A very very similar to any distribution in LINUX....
You Just Make sure that , You added a Repository & that contains the version and application that you want to installed. In our case it's NGINX.
To install nginx in Centos6&7 just install the EPEL repository in your CentOS6.5-BOX
Do a google search as "Install EPEL Repo in Centos6&7"
# wget http://download.fedoraproject.org/pub/epel/6/x86_64/epel-release-6-8.noarch.rpm
# rpm -ivh epel-release-6-8.noarch.rpm

Just do
#yum update ---> Just to make sure all latest updates available in Repos
#rpm -Uvh epel-release-6-8.noarch.rpm --> Just to make sure EPEL repo updated already
#yum repolist --> To check whether our EPEL repository added or not...
#yum update --> Just to make sure all latest updates available in Repos

#yum install -y nginx ---> it installs the nginx HTTP web server in your centos machine
# chkconfig nginx on ---> tells that start nginx automatically in all run-levels whenever your linux machine reboots.
[root@bharath2 bharath]# chkconfig nginx on
[root@bharath2 bharath]# chkconfig --list | grep -i nginx
nginx 0:off 1:off 2:on 3:on 4:on 5:on 6:off
[root@bharath2 bharath]#
once nginx installed lets start the Nginx HTTP web server using below commands.
[root@bharath3 bharath]# service nginx start
Starting nginx: [ OK ]
[root@bharath3 bharath]#
[root@bharath3 bharath]# ps -eaf | grep -i nginx
root 1559 1 0 11:20 ? 00:00:00 nginx: master process /usr/sbin/nginx -c /etc/nginx/nginx.conf
nginx 1561 1559 0 11:20 ? 00:00:00 nginx: worker process
root 1563 1353 0 11:20 pts/0 00:00:00 grep -i nginx
[root@bharath3 bharath]#
To test it ....just give the Public IP of your machine in your Web-browser ... you will able to see the nginx web server page.
To test in Command line itself ....you have to install the Text-based Web Browser called lynx as below..
# yum install -y lynx
To test nginx web server use
# lynx http://localhost
you should be getting below page.

If you are unable to open the nginx page in your web-browser using public IP...please check below firewalls in your Linux machine.
1. #iptables -L -n -v
If any rules it shown up with the above command you have to flush those rules using below command
2. # iptables --flush
And also disable the selinx as well.
3. #setenforce 0
open the file /etc/selinux/config and make entry as SELINUX=disabled
After the above steps try to open the using public IP of your server in my case it's: 52.3.218.34

If you have DNS like Route53 use the entry like below...

Now hit the browser using your own domain name
In my case it's: http://nginx.bharathkumarraju.com/


And the default HTML page location in were we got in Web-browser present in the below directory
Once created we have to add a new vhost file in the vhost.d directory i.e. /etc/nginx/vhost.d
Add a file name called #vim www.myexample.com.conf // we already included the path in
in /etc/nginx/nginx.conf as
include /etc/nginx/vhost.d/*.conf
server {
listen 80;
root /var/www/html/myexample;
index index.html index.htm index.php;
server_name www.myexample.com myexample
}
[root@bharath3 bharath]# cat /var/www/html/myexample/index.html
adding new vhost file in the /etc/nginx/vhost.d/www.myexample.com.conf
www.myexample.com
[root@bharath3 bharath]#
How to add some additional vhost configuration directives specifically called upstream directive.
What the upstream allows us to do is --> to define groups of servers that we can reference and manage using a number of keywords with in our vhost configuration like...........
proxy_pass,fastcgi_pass,scgi_pass,memcached_pass...
What it means is ......
for example: We are going to use node.js application that is simply going to serve an index.html file on the port 8888.... server.js contains a HTTP Server that we are going to use here....Server.js going to serve index.html it is a static file server.
Create a directory called node in the path /var/www/html
#mkdir -p /var/www/html/node
Inside node create a file called server.js contains the below code ... for the HTTP server that we are going to using . Refer the link : http://www.sitepoint.com/creating-a-http-server-in-node-js/
var http = require("http"),
url = require("url"),
path = require("path"),
fs = require("fs")
port = process.argv[2] || 8888;
http.createServer(function(request, response) {
var uri = url.parse(request.url).pathname
, filename = path.join(process.cwd(), uri);
var contentTypesByExtension = {
'.html': "text/html",
'.css': "text/css",
'.js': "text/javascript"
};
fs.exists(filename, function(exists) {
if(!exists) {
response.writeHead(404, {"Content-Type": "text/plain"});
response.write("404 Not Found\n");
response.end();
return;
}
if (fs.statSync(filename).isDirectory()) filename += '/index.html';
fs.readFile(filename, "binary", function(err, file) {
if(err) {
response.writeHead(500, {"Content-Type": "text/plain"});
response.write(err + "\n");
response.end();
return;
}
var headers = {};
var contentType = contentTypesByExtension[path.extname(filename)];
if (contentType) headers["Content-Type"] = contentType;
response.writeHead(200, headers);
response.write(file, "binary");
response.end();
});
});
}).listen(parseInt(port, 10));
console.log("Static file server running at\n => http://localhost:" + port + "/\nCTRL + C to shutdown");
In order to work node.js you have to install nodejs in centOS...i.e using below command.
#yum install -y nodejs and also install npm (i.e. Nodejs Package Manager), npm also allows us to install dependencies in your nodejs file.....
#yum install -y npm
Just run the server.js using below command
[root@bharath3 node]# node server.js &
[1] 10432
[root@bharath3 node]# Static file server running at
=> http://localhost:8888/
CTRL + C to shutdown
[root@bharath3 node]#
[root@bharath3 node]# netstat -plant | grep 8888
tcp 0 0 0.0.0.0:8888 0.0.0.0:* LISTEN 10432/node
We are using nodejs to demonstrate the upstream directive .....:)
After above configuration we have add new entry in the /etc/hosts file as below
172.31.7.160 www.mynodejs.com mynodejs
so now we have a nodejs entry for the local application itself
Now create a index.html file in the directory /var/www/html/node
echo " This is mynodejs application example " > index.html
[root@bharath3 node]# ls -lrth
total 4.0K
-rwxr-xr-x. 1 root root 931 Jul 21 04:16 server.js
[root@bharath3 node]# pwd
/var/www/html/node
[root@bharath3 node]# echo " This is my new nodejs application file " > index.html
[root@bharath3 node]#
Nginx Features:

Although HTTP Web server is currently the king of the web servers, nginx is making its mask.
As the ubiquity of the web continues to extend it's reach into every facet of our lives , Performance becomes paramount as concurrency increases.
The Internet of things may be what pushes King off the Wall.
Nginx Installation & Setup in Linux(Centos-6.5):
A Simple installtion methods, A very very similar to any distribution in LINUX....
You Just Make sure that , You added a Repository & that contains the version and application that you want to installed. In our case it's NGINX.
To install nginx in Centos6&7 just install the EPEL repository in your CentOS6.5-BOX
Do a google search as "Install EPEL Repo in Centos6&7"
# wget http://download.fedoraproject.org/pub/epel/6/x86_64/epel-release-6-8.noarch.rpm
# rpm -ivh epel-release-6-8.noarch.rpm

Just do
#yum update ---> Just to make sure all latest updates available in Repos
#rpm -Uvh epel-release-6-8.noarch.rpm --> Just to make sure EPEL repo updated already
#yum repolist --> To check whether our EPEL repository added or not...
#yum update --> Just to make sure all latest updates available in Repos

1.Installing nginx:
#yum install -y nginx ---> it installs the nginx HTTP web server in your centos machine
# chkconfig nginx on ---> tells that start nginx automatically in all run-levels whenever your linux machine reboots.
[root@bharath2 bharath]# chkconfig nginx on
[root@bharath2 bharath]# chkconfig --list | grep -i nginx
nginx 0:off 1:off 2:on 3:on 4:on 5:on 6:off
[root@bharath2 bharath]#
once nginx installed lets start the Nginx HTTP web server using below commands.
[root@bharath3 bharath]# service nginx start
Starting nginx: [ OK ]
[root@bharath3 bharath]#
[root@bharath3 bharath]# ps -eaf | grep -i nginx
root 1559 1 0 11:20 ? 00:00:00 nginx: master process /usr/sbin/nginx -c /etc/nginx/nginx.conf
nginx 1561 1559 0 11:20 ? 00:00:00 nginx: worker process
root 1563 1353 0 11:20 pts/0 00:00:00 grep -i nginx
[root@bharath3 bharath]#
To test it ....just give the Public IP of your machine in your Web-browser ... you will able to see the nginx web server page.
To test in Command line itself ....you have to install the Text-based Web Browser called lynx as below..
# yum install -y lynx
To test nginx web server use
# lynx http://localhost
you should be getting below page.

If you are unable to open the nginx page in your web-browser using public IP...please check below firewalls in your Linux machine.
1. #iptables -L -n -v
If any rules it shown up with the above command you have to flush those rules using below command
2. # iptables --flush
And also disable the selinx as well.
3. #setenforce 0
open the file /etc/selinux/config and make entry as SELINUX=disabled
After the above steps try to open the using public IP of your server in my case it's: 52.3.218.34

If you have DNS like Route53 use the entry like below...

Now hit the browser using your own domain name
In my case it's: http://nginx.bharathkumarraju.com/

2.Understanding the Configuration Files in NGINX:
The main Root directory of nginx is /etc/nginx
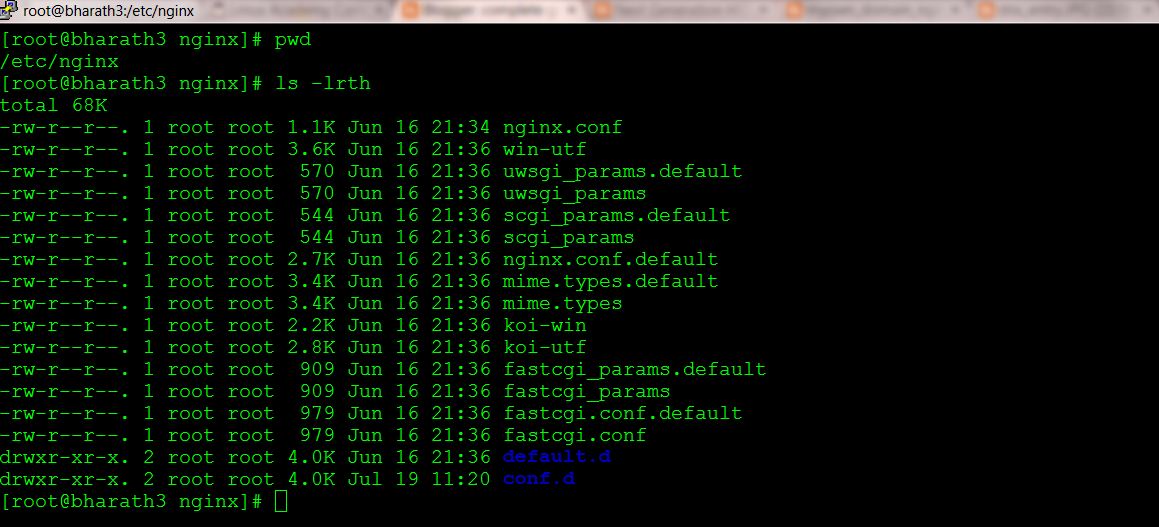
The main config file would be /etc/nginx/nginx.conf

and the most important file gonna be present under the /etc/nginx/conf.d directory ...the file names are
1) ssl.conf
2) virtual.conf
3) default.conf
And the default HTML page location in were we got in Web-browser present in the below directory
[root@bharath3 conf.d]# cd /usr/share/nginx/html/
[root@bharath3 html]# ls -lrth
total 20K
-rw-r--r--. 1 root root 2.8K Jun 16 21:34 poweredby.png
-rw-r--r--. 1 root root 368 Jun 16 21:34 nginx-logo.png
-rw-r--r--. 1 root root 3.7K Jun 16 21:34 index.html
-rw-r--r--. 1 root root 3.7K Jun 16 21:34 50x.html
-rw-r--r--. 1 root root 3.6K Jun 16 21:34 404.html
[root@bharath3 html]#
3.Configuration Optimization in NGINX
We can look at some ways were we can optimize the nginx to work on our particular system.
We can have look at things like how much memory we have available , How many CPU'S we have available and how that can affect the amount of processes , threads and other limits that we can set with in our nginx configuration file ( mainlt /etc/nginx/nginx.conf) to optimize the performance of our system.
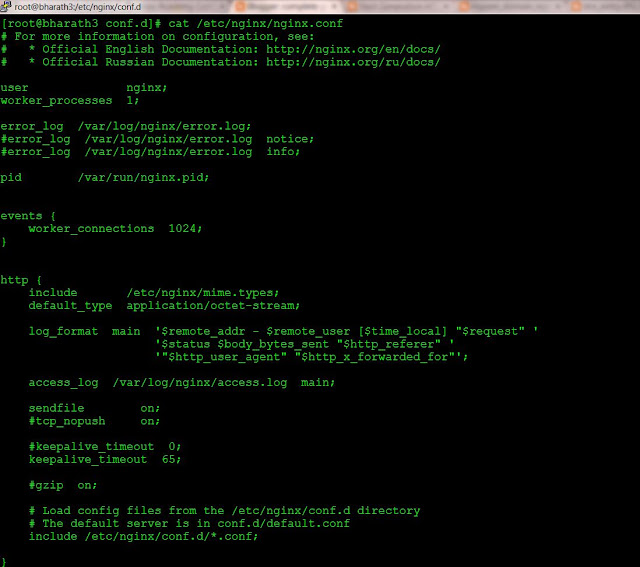
Open the file cat /etc/nginx/nginx.conf you can see below two lines
i.e. worker_processes and worker_connections ..... these two variables are the really kind of the backbone of the nginx .
worker_processes 1;
events {
worker_connections 1024;
}
worker_processes : Responsible for letting the virtual server know or your physical server to know how many workers to spawn , once it's becomes to bound to the proper IP address and ports.
In my case , I just have a bound to my localhost IP and port 80. But it can be If we have multiple Ethernet addresses on our system , virtual or otherwise bridged adapters setted , we can of course bind nginx to any of those ip's and we can bind it to any port 80,443(these are the most common ports). Of course we can bind it to any other ports whatever we like.
It's pretty common to run One worker_process per CORE. Anything above one worker process per core won't really hard our system but it may lead to some idle connections lying about were we can't get to. In other words we may be out locating our worker processes.
So one of the things we need to do check our processors (CORES) using below command.We have only one core available as below...
[root@bharath3 html]# cat /proc/cpuinfo
processor : 0
vendor_id : GenuineIntel
cpu family : 6
model : 45
model name : Intel(R) Xeon(R) CPU E5-2650 0 @ 2.00GHz
stepping : 7
cpu MHz : 1795.672
cache size : 20480 KB
fpu : yes
fpu_exception : yes
cpuid level : 13
wp : yes
flags : fpu de tsc msr pae cx8 sep cmov pat clflush mmx fxsr sse sse2 ss ht syscall nx lm up rep_good unfair_spinlock pni pclmulqdq ssse3 cx16 pcid sse4_1 sse4_2 x2apic popcnt tsc_deadline_timer aes hypervisor lahf_lm
bogomips : 3591.34
clflush size : 64
cache_alignment : 64
address sizes : 46 bits physical, 48 bits virtual
power management:
[root@bharath3 html]#
[root@bharath3 html]# cat /proc/cpuinfo | grep -i processor | wc -l
1
[root@bharath3 html]#
We have only one CORE in our system as above. If we could have multiple CORE system we can change the number in the worker_processes <<number_of_CORES>>;
worker_connections 1024 : It tells about our work processes how many concurrent connections that nginx can serve.
In other words how many end-users can be simultaneously served as web connection on nginx.
By default worker_connections is 768 , and also keep in mind that browser generally opens two or three connections to every server .
We can check our CORE limitations(ulimit -n) and set the worker_connections .
[root@bharath3 html]# ulimit -a
core file size (blocks, -c) 0
data seg size (kbytes, -d) unlimited
scheduling priority (-e) 0
file size (blocks, -f) unlimited
pending signals (-i) 4553
max locked memory (kbytes, -l) 64
max memory size (kbytes, -m) unlimited
open files (-n) 1024
pipe size (512 bytes, -p) 8
POSIX message queues (bytes, -q) 819200
real-time priority (-r) 0
stack size (kbytes, -s) 10240
cpu time (seconds, -t) unlimited
max user processes (-u) 4553
virtual memory (kbytes, -v) unlimited
file locks (-x) unlimited
[root@bharath3 html]# ulimit -n
1024
[root@bharath3 html]#
If buffer size is too low then nginx have to write temporary files which could cause read/write constantly on your system. One of the disadvantages of lots of reads and writes is , It significantly adds load on the system .
If more load on the system..i.e. More i/o wait that happens , that longer it takes to respond to request...
There are 4 buffer types .....
1.Client Body Buffer size
2.Client Header Buffer size
3.Client Max Body Size
4.Large Client Header Buffers 2
#cat /etc/nginx/nginx.conf
user nginx;
worker_processes 1;
error_log /var/log/nginx/error.log;
pid /var/run/nginx.pid;
events {
worker_connections 1024;
}
http {
include /etc/nginx/mime.types;
default_type application/octet-stream;
log_format main '$remote_addr - $remote_user [$time_local] "$request" '
'$status $body_bytes_sent "$http_referer" '
'"$http_user_agent" "$http_x_forwarded_for"';
access_log /var/log/nginx/access.log main;
sendfile on;
keepalive_timeout 65;
#Buffer_configs;
client_body_buffer_size 10k;
client_header_buffer_size 1k;
client_max_body_size 10m; # based on the memory available in your system
large_client_header_buffers 2 1k;
#TimeOut_configs
client_body_timeout 12; #seconds
client_header_timeout 12;
keepalive_timeout 15;
send_timeout 15;
#gzip on;
include /etc/nginx/conf.d/*.conf;
}
# service nginx reload // wont shout down existing connections
#service nginx repoen // closes and re-opens log files
# systemctl reload nginx.service // centOS7
In my case , I just have a bound to my localhost IP and port 80. But it can be If we have multiple Ethernet addresses on our system , virtual or otherwise bridged adapters setted , we can of course bind nginx to any of those ip's and we can bind it to any port 80,443(these are the most common ports). Of course we can bind it to any other ports whatever we like.
It's pretty common to run One worker_process per CORE. Anything above one worker process per core won't really hard our system but it may lead to some idle connections lying about were we can't get to. In other words we may be out locating our worker processes.
So one of the things we need to do check our processors (CORES) using below command.We have only one core available as below...
[root@bharath3 html]# cat /proc/cpuinfo
processor : 0
vendor_id : GenuineIntel
cpu family : 6
model : 45
model name : Intel(R) Xeon(R) CPU E5-2650 0 @ 2.00GHz
stepping : 7
cpu MHz : 1795.672
cache size : 20480 KB
fpu : yes
fpu_exception : yes
cpuid level : 13
wp : yes
flags : fpu de tsc msr pae cx8 sep cmov pat clflush mmx fxsr sse sse2 ss ht syscall nx lm up rep_good unfair_spinlock pni pclmulqdq ssse3 cx16 pcid sse4_1 sse4_2 x2apic popcnt tsc_deadline_timer aes hypervisor lahf_lm
bogomips : 3591.34
clflush size : 64
cache_alignment : 64
address sizes : 46 bits physical, 48 bits virtual
power management:
[root@bharath3 html]#
1
[root@bharath3 html]#
We have only one CORE in our system as above. If we could have multiple CORE system we can change the number in the worker_processes <<number_of_CORES>>;
worker_connections 1024 : It tells about our work processes how many concurrent connections that nginx can serve.
In other words how many end-users can be simultaneously served as web connection on nginx.
By default worker_connections is 768 , and also keep in mind that browser generally opens two or three connections to every server .
We can check our CORE limitations(ulimit -n) and set the worker_connections .
[root@bharath3 html]# ulimit -a
core file size (blocks, -c) 0
data seg size (kbytes, -d) unlimited
scheduling priority (-e) 0
file size (blocks, -f) unlimited
pending signals (-i) 4553
max locked memory (kbytes, -l) 64
max memory size (kbytes, -m) unlimited
open files (-n) 1024
pipe size (512 bytes, -p) 8
POSIX message queues (bytes, -q) 819200
real-time priority (-r) 0
stack size (kbytes, -s) 10240
cpu time (seconds, -t) unlimited
max user processes (-u) 4553
virtual memory (kbytes, -v) unlimited
file locks (-x) unlimited
[root@bharath3 html]# ulimit -n
1024
[root@bharath3 html]#
Buffers:
If buffer size is too low then nginx have to write temporary files which could cause read/write constantly on your system. One of the disadvantages of lots of reads and writes is , It significantly adds load on the system .
If more load on the system..i.e. More i/o wait that happens , that longer it takes to respond to request...
There are 4 buffer types .....
1.Client Body Buffer size
2.Client Header Buffer size
3.Client Max Body Size
4.Large Client Header Buffers 2
1.Client Body Buffer size : It handles the client buffer side or anything post actions send to nginx. That typically Form submissions for example.
2.Client Header Buffer Size : Although it similar to above , it only handles the client header size. 1024 bytes is the decent size for that particular directive
3.Client Max Body Size : It is the maximum allowed size for the client request. So if the maximum size is exceeded then nginx throws a 413 error called request entity is too large.
4. Large Client Header Buffers 2 : which is the maximum number in size buffers for the large client headers.
Let's add all above config in /etc/nginx/nginx.conf file with below parameters
#cat /etc/nginx/nginx.conf
user nginx;
worker_processes 1;
error_log /var/log/nginx/error.log;
pid /var/run/nginx.pid;
events {
worker_connections 1024;
}
http {
include /etc/nginx/mime.types;
default_type application/octet-stream;
log_format main '$remote_addr - $remote_user [$time_local] "$request" '
'$status $body_bytes_sent "$http_referer" '
'"$http_user_agent" "$http_x_forwarded_for"';
access_log /var/log/nginx/access.log main;
sendfile on;
keepalive_timeout 65;
#Buffer_configs;
client_body_buffer_size 10k;
client_header_buffer_size 1k;
client_max_body_size 10m; # based on the memory available in your system
large_client_header_buffers 2 1k;
#gzip on;
include /etc/nginx/conf.d/*.conf;
}
-------------------------------
#nginx -t
#service nginx restart
#nginx -t
#service nginx restart
TimeOuts:
These are very important , they can drastically improve the performance
1. Client_Body_Timeout
2. Header_Timeout
These are the directives that are responsible for the time that your server waits for your client body or header to be sent after the request.So if the neither one is sent the server issues a 408 Request Timeout.
In Conjunction with above the another directive called
3.KeepAlive_Timeout --> This assigns the timeout for keep alive connections with the client ..
Basically it means nginx will close connections with client after this period of time.
4.Send_Timeout --> This actually established not on the entire transfer of the connection but between two operations of reading. After this time client will take nothing then nginx will shut-down the connection.
How to add above four time outs in the nginx.conf file
user nginx;
worker_processes 1;
error_log /var/log/nginx/error.log;
pid /var/run/nginx.pid;
events {
worker_connections 1024;
}
http {
include /etc/nginx/mime.types;
default_type application/octet-stream;
log_format main '$remote_addr - $remote_user [$time_local] "$request" '
'$status $body_bytes_sent "$http_referer" '
'"$http_user_agent" "$http_x_forwarded_for"';
access_log /var/log/nginx/access.log main;
sendfile on;
keepalive_timeout 65;
#Buffer_configs;
client_body_buffer_size 10k;
client_header_buffer_size 1k;
client_max_body_size 10m; # based on the memory available in your system
large_client_header_buffers 2 1k;
#TimeOut_configs
client_body_timeout 12; #seconds
client_header_timeout 12;
keepalive_timeout 15;
send_timeout 15;
#gzip on;
include /etc/nginx/conf.d/*.conf;
}
#nginx -t
#service nginx restart
#service nginx restart
4.Standard Configuration in NGINX:
Adding additional configurations into our basic Configuration files.
include external vhosts.conf file in the /etc/nginx/nginx.conf file.
i.e. include /etc/nginx/vhost.d/*.conf
[root@bharath3 nginx]# cd vhost.d/
[root@bharath3 vhost.d]# pwd
/etc/nginx/vhost.d
[root@bharath3 vhost.d]# mv ../conf.d/default.conf .
[root@bharath3 vhost.d]# ls -lrth
total 4.0K
-rw-r--r--. 1 root root 1.3K Jun 16 21:34 default.conf
[root@bharath3 vhost.d]#
[root@bharath3 nginx]# cd vhost.d/
[root@bharath3 vhost.d]# pwd
/etc/nginx/vhost.d
[root@bharath3 vhost.d]# mv ../conf.d/default.conf .
[root@bharath3 vhost.d]# ls -lrth
total 4.0K
-rw-r--r--. 1 root root 1.3K Jun 16 21:34 default.conf
[root@bharath3 vhost.d]#
change default.conf file with below details.
# include /etc/nginx/default.d/*.conf; // comment it
location / {
# root /usr/share/nginx/html; // comment it
root /var/www/html; // add a new html directory
index index.html index.htm;
}
Create a directory as # mkdir -p /var/www/html ; cd /var/www/html
create a file # echo "This is new HTML index file " > index.html
---------------------------
#lynx http://localhost
#nginx -t
#service nginx restart
http://nginx.bharathkumarraju.com/ open in browser

create a file # echo "This is new HTML index file " > index.html
---------------------------
#lynx http://localhost
#nginx -t
#service nginx restart
http://nginx.bharathkumarraju.com/ open in browser

# service nginx reload // wont shout down existing connections
#service nginx repoen // closes and re-opens log files
# systemctl reload nginx.service // centOS7
5.Vhost files in NGINX:
How to allow our nginx web server to answer for various domains by configuring them in Vhost files (Virtual Hosts).
The default method in the nginx.conf file, but then move to the more common externalization of those files and how to set them up to answer for our configured domains and file system locations.
1. Just add an entry in the /etc/hosts file as below
172.31.7.160 www.myexample.com // IP of your machine and domain name
Just ping the above domain name as below..

1. Just add an entry in the /etc/hosts file as below
172.31.7.160 www.myexample.com // IP of your machine and domain name
Just ping the above domain name as below..

[root@bharath3 bharath]# mkdir /var/www/html/myexample
[root@bharath3 bharath]# echo "www.myexample.com" > /var/www/html/myexample/index.html
[root@bharath3 bharath]#
[root@bharath3 bharath]# echo "www.myexample.com" > /var/www/html/myexample/index.html
[root@bharath3 bharath]#
Once created we have to add a new vhost file in the vhost.d directory i.e. /etc/nginx/vhost.d
Add a file name called #vim www.myexample.com.conf // we already included the path in
in /etc/nginx/nginx.conf as
include /etc/nginx/vhost.d/*.conf
server {
listen 80;
root /var/www/html/myexample;
index index.html index.htm index.php;
server_name www.myexample.com myexample
}
After adding above file use # nginx -t and #service nginx restart
[root@bharath3 bharath]# cat /var/www/html/myexample/index.html
adding new vhost file in the /etc/nginx/vhost.d/www.myexample.com.conf
www.myexample.com
[root@bharath3 bharath]#
[root@bharath3 bharath]# lynx http://www.myexample.com

In Browser Try with below... http://nginx.bharathkumarraju.com/myexample/


In Browser Try with below... http://nginx.bharathkumarraju.com/myexample/

6. upstream Directive in NGINX:
What the upstream allows us to do is --> to define groups of servers that we can reference and manage using a number of keywords with in our vhost configuration like...........
proxy_pass,fastcgi_pass,scgi_pass,memcached_pass...
What it means is ......
for example: We are going to use node.js application that is simply going to serve an index.html file on the port 8888.... server.js contains a HTTP Server that we are going to use here....Server.js going to serve index.html it is a static file server.
Create a directory called node in the path /var/www/html
#mkdir -p /var/www/html/node
Inside node create a file called server.js contains the below code ... for the HTTP server that we are going to using . Refer the link : http://www.sitepoint.com/creating-a-http-server-in-node-js/
var http = require("http"),
url = require("url"),
path = require("path"),
fs = require("fs")
port = process.argv[2] || 8888;
http.createServer(function(request, response) {
var uri = url.parse(request.url).pathname
, filename = path.join(process.cwd(), uri);
var contentTypesByExtension = {
'.html': "text/html",
'.css': "text/css",
'.js': "text/javascript"
};
fs.exists(filename, function(exists) {
if(!exists) {
response.writeHead(404, {"Content-Type": "text/plain"});
response.write("404 Not Found\n");
response.end();
return;
}
if (fs.statSync(filename).isDirectory()) filename += '/index.html';
fs.readFile(filename, "binary", function(err, file) {
if(err) {
response.writeHead(500, {"Content-Type": "text/plain"});
response.write(err + "\n");
response.end();
return;
}
var headers = {};
var contentType = contentTypesByExtension[path.extname(filename)];
if (contentType) headers["Content-Type"] = contentType;
response.writeHead(200, headers);
response.write(file, "binary");
response.end();
});
});
}).listen(parseInt(port, 10));
console.log("Static file server running at\n => http://localhost:" + port + "/\nCTRL + C to shutdown");
In order to work node.js you have to install nodejs in centOS...i.e using below command.
#yum install -y nodejs and also install npm (i.e. Nodejs Package Manager), npm also allows us to install dependencies in your nodejs file.....
#yum install -y npm
Just run the server.js using below command
[root@bharath3 node]# node server.js &
[1] 10432
[root@bharath3 node]# Static file server running at
=> http://localhost:8888/
CTRL + C to shutdown
[root@bharath3 node]#
[root@bharath3 node]# netstat -plant | grep 8888
tcp 0 0 0.0.0.0:8888 0.0.0.0:* LISTEN 10432/node
We are using nodejs to demonstrate the upstream directive .....:)
After above configuration we have add new entry in the /etc/hosts file as below
172.31.7.160 www.mynodejs.com mynodejs
so now we have a nodejs entry for the local application itself
Now create a index.html file in the directory /var/www/html/node
echo " This is mynodejs application example " > index.html
[root@bharath3 node]# ls -lrth
total 4.0K
-rwxr-xr-x. 1 root root 931 Jul 21 04:16 server.js
[root@bharath3 node]# pwd
/var/www/html/node
[root@bharath3 node]# echo " This is my new nodejs application file " > index.html
[root@bharath3 node]#

Comments
Post a Comment